Installing Cement Tile
Install your tile after all other construction if at all possible. Cement tile is very porous and it will be next to impossible to clean if it is soiled before sealing by construction workers.
Installing our cement tiles is a fairly simple process, but it must be done with care. You are creating a work of art, and it is very important that the planning and measuring have been done carefully. We are providing the following documents which will help you install successfully and have a beautiful floor with our handmade cement tiles
Installation Tips
The standard thickness of floor-grade cement tiles is usually 1/2" (12mm), 5/8" (16mm) up to 3/4" (18mm) for larger format tiles. Allow for adequate room under doors, and consider the height difference when transitioning to other materials. Remember to add in the thickness of the thinset mortar you use to lay the tile. Thinner tiles may be produced at a premium for walls and special applications.
As these cement tiles are the work of artisans using natural pigments, variations in color from tile to tile are to be expected and are part of the natural appeal of this type of tile, as are its imperfect edges.
If you are laying tile on a concrete slab, be sure the slab is completely cured to prevent white efflorescence spots from showing up later on the surface of the tile as water evaporates through it.
Assuming that your floor joists are sufficient and not flexing, you can install tile on a wood floor if you first put down a cement backer board like you would do in a shower behind the tile. Your installer can use Wonderboard, HardiBoard, or other dimensionally stable fiber/cement wall boards. Magnesium Oxide boards are also highly recommended.
Installing our cement tiles is a fairly simple process, but it must be done with care. You are creating a work of art and it is very important that the planning and measuring has been done carefully.
It is imperative to use a grout release. See our complete instructions for information about using a first application of our NanoSealant to serve as a grout release.
DOWNLOAD THE LATEST INSTALLATION GUIDE
Video: Cement Tile Installation Demonstration
A demonstration of installing cement tile, using Villa Lagoon Tile's NanoSealant from VSeal.
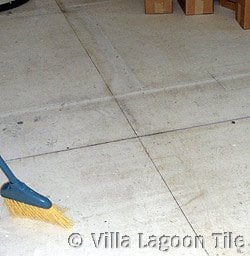
The calculations are made to determine the number of tiles needed
The typical encaustic cement tile floor has a central "bordered carpet" surounded by solid colored tiles. The center of the room or the center of the central design elements must be located. Then the calculations are made to determine the number of tiles needed to create the desired pattern in each direction. For an central rug-like design, measure the area to be tiled, and find the center of two opposite walls or sides. Use these points to snap a chalk line across the length of the area, in the center of the floor, dividing the room or area in half. Then snap another chalk line perpendicular to the first so the two lines cross in the center of the room. Check where the lines intersect with a carpenter's square to make absolutely sure the center point has a 90-degree angled quadrant. Start by laying a tile at the intersection of the lines, and then use the lines as a guide, as you work your way outward toward the walls in each quadrant. You will likely need to cut tiles at the walls. See "How to Cut Cement Tile", for more information, and a video demonstration.
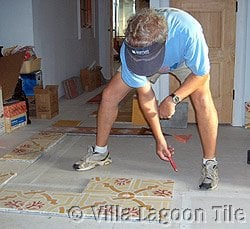
Mix tiles from different boxes as you lay them.
Each cement tile is an individually hand-made work of art and variations, such as in thickness, color shade, and imperfections like irregular edges are inherent to this type of product. These characteristics add to the products natural appeal and do not compromise the performance of the tile. For this reason, it is important for an entire order to be placed at once as colors can vary slightly from batch to batch. You want all your tiles to have been made at the same time. Mix tiles from different boxes as you lay them.
The surface on which you are installing the tile must be smooth and free from debris, grease, or wax.
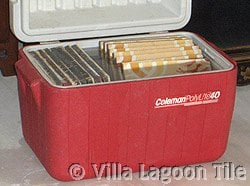
Cement tiles are absorbant and should be soaked in water for a few seconds before they are laid.
On a complicated floor layout, be sure to do a "dry run" with some of your tile to be sure that your borders will fall where you want them and that any tile that you want centered in front of a doorway, is properly aligned. Do not step on your tile during this layout exercise. Alternately, make color copies on paper and use these for your experimental layouts.
For areas subject to moisture like showers, around pools, etc, the underlayment should be sealed with a waterproof membrane or other moisture-resistant product. Cement-fiber board makes an ideal underlayment for tile in wet locations. These boards are often referred to as cement board, wonderboard, duraroc, hardiboard, magnesium oxide board, MgO board, etc. The cement board is composed of cement and fiber that gives it its strength and resistance to moisture.
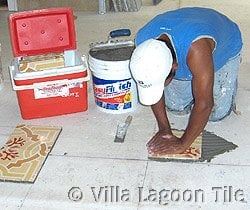
The thinset must be spread on the floor and also over the entire underside of the tile
Cement tiles are absorbant and should be soaked in water for a few seconds before they are laid in the thinset mortar bed.The purpose of this is to prevent the tiles from pulling moisture from the mortar, preventing it from curing properly.
One method of installation of cement tiles requires a double spread of thinset adhesive. The thinset must be spread on the floor and also over the entire underside of the tile. This is often called 'back-buttering' the tile. Using spot dollops of thinset buttered on the back will cause the tiles to sit unevenly and later crack.
We have had fine results by using a 3/4" toothed trowel or a 1/2 notched trowel if 3/4 inch is not available.

The thinset must be spread on the floor and also over the entire underside of the tile
To level your tiles,do not use a mallet of any kind.If you do, you will end up with cracks.Use your hand only.If you let the installer use a mallet, cracks may show up later, even if you do not see them immediately./p>
Press tile into position with a forward and back motion perpendicular to adhesive ridges to collapse the ridge and ensure 100% layer of thinset under all parts of your tile.
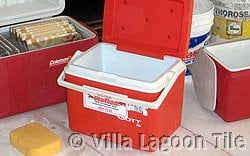
You may want to have a couple of extra old coolers around or an empty tub for the tile layer to place the wet tiles in
You may want to have a couple of extra old coolers around or an empty tub for the tile layer to place the wet tiles in to allow them to drain a bit before he lays them. You do not want them so wet that they dilute the thinset mortar bed.
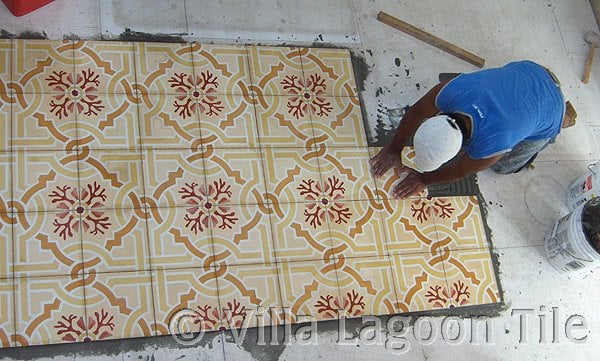
For interiors the tiles can be installed edge to edge about 1/16 of an inch apart and laid on a perfectly leveled and clean surface
For interiors the tiles can be installed edge to edge about 1/16 of an inch apart and laid on a perfectly leveled and clean surface. Most of our patterned designs are intended to be turned 90 degrees each tile one is laid to form the pattern.
Use untinted grout only, or closely-matched grout on solid color tiles. Improper installation can cause the tiles to be stained by the grout tint, causing haze over dark regions, or making lighter regions appear dingy.
The tiles must handled carefully to avoid damaging the edges.
Once you set your tile in the thinset on the floor and have it level, use the sharp edge of a tile tool to scrape away the thinset immediatly next to the tile (about 1/2 inch wide), so when you place your next tile, excess mortar has someplace to spread into and does not get pushed up into your grout line.
Any residue of mortar left on the surface of the tile must be cleaned immediatelyto avoid staining. After allowing the area to dry completely, clean any excess adhesive or spots, if any, with a #180 or #220medium or fairly coarse sand paper. (If you use a fine sandpaper you can actually hone or polish the tile in that spot and it will show) See also more information on cleaning up after grouting in our printable Installation Instructions.
Do not step on the tiles until the mortar has cured and dried. Once it can bear weight, continue being very cautious. Until the tiles are sealed, they are very succeptible to being permanently marred by spills, grout, and ground-in dirt. If there is any other construction going on concurrently with the tile installation, make sure that all other trades understand not to walk on the raw tiles. There are products available such as RamBoard that can provide a breathable barier walkway over set, but not yet sealed installations.
If you are installing a sub-floor heating system: do not under any circumstance allow the system to be powered on until the installation is complete. Many sub-contractors may want to test their system as soon as the tile is set, so they can move on to the next job. Testing a sub-floor heating system beneath wet tiles can permanently damage your flooring.
If possible, try to find an installer who has had some experience with mosaico hidraulico/cement tile/Cuban tile. Check with the older craftsmen in your area, or those from Latin America, but be sure they can read our Printable Cement Tile Installation Instructions. If they can only read Spanish, that's no problem, just make sure to print a copy of our Spanish version: La Baldosa de Cemento Instalación.
Pre-Grout Sealing
Whether using our recommended installation method, or any other, cement tiles must be protected by a sealant or grout-release before grouting the tile. Cement tile is very porous. Grout applied over raw tile can penetrate into the surface of the tile.
Our recommended Villa Lagoon Tile Grout-Release and NanoSealant requires two coats, and the first coat should be applied before grouting, to serve this purpose.
Before sealing, the mortar and tiles should be completely dry. Trapping moisture into the installation can cause moderate to severe aesthetic problems, such as ghosting, or a blotchy appearance. The installation will need at least 24-36 hours to cure and dry before the pre-grout sealing. This may take longer in high humidity. The tile should be completely clean as well; any dirt or mortar stains in the tile when sealed will remain there forever.
With any sealant or grout release, you will want to apply the product very thinly: more is rarely better. Thick applications of any product can dry unevenly, cause a gummy surface, or drip over the sides of the tile, preventing adhesion between the tile sides and the grout. Please refer to our printable instructions for applying VLT NanoSealant. The NanoSealant will require 24 hours to cure before traffic, and 48 hours before it reaches maximum hardness.
Use non-sanded grout for joints under 1/8 inch. Interior grout lines in cement tile floors are usually very thin. On exterior installations or very wet areas such as bathrooms, use wider grout lines with sanded grout.
Do not use dark colored grout on tile with light colors. Test any grout on a scrap of tile to be sure there will be no staining. A non-tinted neutral gray is best for tiles with light and dark areas.
Traditionally a very narrow joint is used between the tiles indoors. Recommendation is not more than 1.0 to 1.5 mm. You will usually want to use a very neutral color joint mix or one similar to your tile colors. Traditionally, the color grout used for hydraulic cement floor tiles is light grey cement. On tightly spaced tiles use a thin consistency grout, not a thick paste.
The grout should be thin enough to completely fill the narrow joints.
Apply the grout with a rubber float or with a rubber squeegee, always moving diagonally across the joints. Any excess grout should be removed with a damp cloth or sponge before it dries.
OR Another method to clean grout off the tile is the sawdust method:
You need several bags of sawdust depending on the size of the floor. Grout your tile in the usual manner. When it's ready to clean, dump a pile of sawdust on the floor and sprinkle it with water to dampen it. Not wet -- just slightly damp. Push the sawdust across the floor with a push broom with soft bristles, and you'll be amazed. Change to clean sawdust periodically. You may need to touch up slightly with a sponge, but only slightly.
The sawdust grout cleaning method is used more often in Europe than in the USA. Sometimes a mix of sawdust and dry grout mix is used initially and the dry grout acts as an abrasive to scrub up the grout residue.
Once the grout is cured and dry it should be sealed. Install your tile after all other construction if at all possible. Any construction grime left on the tile before the final sealant layer will be permanent. If you think you will not be able to avoid construction on top of your new floor, protect it well with plywood or some other breathable layer.
Let the newly-grouted floor cure and dry thouroughly for at least 24 hours. Sealing the floor tiles too soon after grouting will trap humidity and spots may appear later.
Sealing the Cement Tile Floor
Only use a sealant that you have first hand experience with if you chose not to follow our recommendations. We can furnish your sealant with your tile if you like.
Be very weary of tile contractors suggesting their own sealants. Cement tile is a very niche product, and not all tile-setters have experience with them. If your contractor attempts to veer from our recommendations, please do seek references from their other clients specifically with cement tile. Ask them about the age and location of their installation. Ask about maintenance issues, staining, etc. Keep in mind that not every installation will be subject to the same use. Bedrooms and accent walls, for instance, will not be subject to the same spills and potential stains as kitchens, bathrooms, and mud rooms. Of course, this is also good advice for any hiring decision.
Once the grouted installation is dry and clean, apply the final coat of NanoSealant. This provides a final layer of protection for your tile, as well as protecting and sealing the grout. Please refer to our Installation Guide for application direction, the final sealant layer will require 24 hours to cure, and 48 hours to reach maximum hardness.
For commercial high-traffic applications and wet areas such as fountains and swimming pool waterlines, alternate or additional sealers may be required. Call us at 1-251-968-3375 or e-mail [email protected] to discuss your project.
Cement Tile Floor Care
Cement tiles should be regularly mopped with clean water. Never use acids to clean the encaustic cement tiles as it will cause damage. Visit our page on cleaning cement tile for more information.
In some cases, particularly with new construction, settling and shifting of the substrate may cause cracks to develop. Often this occurs along grout lines, but it may open a crack in the sealant layer. This will allow moisture to penetrate, particularly in wet areas such as bathrooms. When this occurs, our NanoSealant can be carefully reapplied along the crack. Make sure to allow plenty of time to dry, before doing so.
Polished Tile Floors
There is a professional polishing process called "crystallization" that can give you a very high gloss. This process uses special equipment. Check your local yellow pages for marble or concrete polishing professionals if you desire a very high gloss finish. Read more here. You will still need to seal your tiles.
Sand Bed Alternate Method of Installation
Occasionally people ask about the very old-time method of laying cement tile on a packed sand under layer. It is because of this method that many antique tiles have been salvaged in very good shape. Once you get the first tile out, you can pop up the others by digging into the packed sand beneath. These sand installations had very permanent borders or solid walls. The sand cannot shift in the contained area once it is mechanically packed tight.
We have no first hand experience with this method, but give information here just as a help to people doing research or restoring an old home. Some people with cement tile that they call Cuban Tile in Florida have tiles installed this way.
This traditional method calls for laying tile in a bed of thick mortar on stabilized sand or substrate. This method is seldom used today, has several drawbacks, and requires that a few additional precautions are taken.
One thing is the immersion of the tiles in water for at least 4 hours before laying. Then it is imperative not to use a mallet which would crack the tiles.
The possibility of efflorescence (white-grey crystals of salts) appearing after the tiles are laid. Eventually these may disappear, but only after frequent washing.
There is a long period of drying-out required before being able to seal your tile floor with sealant and wax or a top coat sealant like those we recommend.
For this method there is a need for tiles to be laid by an experienced professional tile layer familiar with this technique.
Call us or e-mail to discuss your project.
Tel: 1-251-968-3375

